Two posts ago, I dropped a hint about a basic ruby gem I was trying to build. At the time, building one’s own gem(s) seemed to be the de rigueur object of our collective fascination at Flatiron. I guess that’s because we were all itching to start building things, and we hadn’t yet begun to learn Rails.
So I’m a little late to our gem-party, but I’m so happy I gave it a go (better late than never, right? Cue: mental reminders about ‘unrealistic self-expectations’). Because inevitably, the thing you learn most about through the process of gem-building — as is the case with absolutely anything you’ll ever build with code — is git.
Only joking.
But really, I did actually learn an unexpected amount more about git. And with that said, since everyone loves lists, here’s a list of 5 simple tips and lessons from my personal experience with ruby gem-building:
1. Just start with the RubyGems Guide. Like, seriously.
Don’t waste hours debating your starting point. Just start with the RubyGems Guide. Having done precisely the opposite — I ditched the guide in favor of a Treehouse video tutorial then got confused and ended up coming back to the guide — I know now that the RubyGems Guide is actually the easiest thing to follow. It walks you through the process of building a simple “Hello World!” gem, and without having to worry much at all about project directories or structure, you can build and ship your first ruby gem in about 15 minutes.
2. Then try a tutorial, like this one
Once you’ve familiarized yourself a bit with basic directory organization and in which directories stuff should go, you can then follow along with this Treehouse tutorial to build your real gem. The main reason I suggest you wait until you’ve practiced with the RubyGems Guide first before diving into a tutorial like this one is that the latter instructs you to run this simple command as your starting point:
bundle gem <the name of your gem>
This will perform a bit of magic for you — not unlike the Rails/DHH magic we have at our disposal with the rails g scaffold <the name of your project> command — and instantly create a bunch of directories with files that have placeholder text and stuff in them. While this might sound totally awesome, it can also be confusing to use this as your starting point because you won’t know why things have been set up the way they have. Which is to say, it will be harder for you to customize stuff to suit your needs — because you won’t know what’s going to cause the whole thing to break and what’s okay to change.
So build your directories and files from the ground up yourself first (following the RubyGems Guide), THEN take advantage of shortcuts like bundle gem <the name of your gem>.
3. Don’t forget, you’re using git
If you do go off of the bundle gem shortcut, be aware: it initializes a git repo in your project directory automatically.
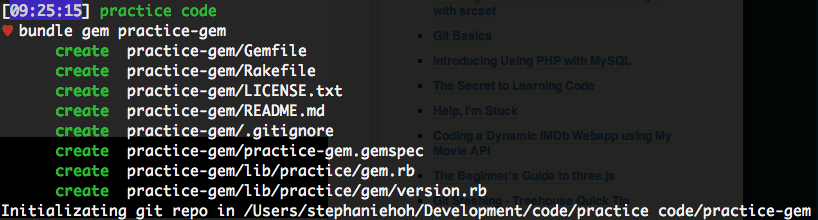
Yes. Look at the last line! Initializing git repo... it says. Somehow, I didn’t pay attention to this detail, so later down the road when I pushed my first version of the gem up to rubygems then instantly realized I had to make an edit and push up a new version, I ran into a huge wall. I kept getting error messages that said something along the lines of “[some_file_name, some_other_file_name] are not files”. And I thought “WHY??! WHAT DO YOU MEAN THEY AREN’T FILES? I’VE SAVED EVERYTHING, I CAN SEE THEM IN MY DIRECTORIES, THEY EXIST! OF COURSE THEY’RE FILES!!”
Well. Turns out, my computer wanted me to do a git add . and git commit before I could proceed with pushing up new gem versions. This is because the bundle gem <the name of my gem> shortcut initialized a git repo for me, which meant I had to start tracking my changes. The fact that I’d forgotten this and/or hadn’t paid attention to the activity in my console from the get-go didn’t change the fact that I now had to answer to git.
4. Make sure your gem-name isn’t already taken
The problem I ran into above (and the subsequent 3 hours of de-bugging) was all due to this basic mistake: I’d forgotten to make sure my gem name wasn’t already taken. So after building everything and trying to run gem push <my gem>, I was promptly denied. This forced me to have to go back and make a lot of changes, including RENAMING MY GEM.
So just check first on RubyGems.org that your gem name hasn’t already been taken! And don’t assume, like I did, that it’s necessarily something more complicated — like an error with my API-key (I ran around in circles trying to ‘fix’ that for a while, when that was never the issue to begin with). It’s really easy to get excited and just start building, and equally easy to jump to crazy conclusions as to where and how you should start debugging your errors.
5. Handle your gemspec with care
Your gemspec is not just some random file you can treat as an afterthought (as is often done unfortunately with README files, for example), just because it doesn’t live in the ‘all-important’ lib or bin directories. Your gemspec file is literally the roadmap TO YOUR GEM, or a blueprint, rather. It contains tons of valuable information such as your gem’s version number, executables, and run-time dependencies, to name a few.
Furthermore, as you can see, when you actually run the gem build <yourgemname.gemspec> command to BUILD your gem, you have to build it off of the gemspec! It’s just convention. Needless to say, your gemspec file is important. Update it, make sure it contains accurate information, and treat it with care.
================================================================
All of that said, I had a lot of fun building my first gem. Special shoutout to our TA Spencer Rogers for helping me de-bug and ultimately realize that my 3-hour roadblock had, in fact, stemmed 100% from git troubles.
My gem is called billboard_chart.
You can install it by running gem install billboard_chart.
Then simply type billboard_chart to see what happens!
(NOTE: 24 hours after I published my gem, Billboard.com decided to switch up some of their CSS selectors so now the scraper generating my data — I used Nokogiri — is acting funny, which means the data also looks a bit funny now. Looks like I now have some ACTUAL de-bugging to do!!!)